Category: Azure
How can I see what OS version my Azure VM is running?
I wanted to check what OS version I had deployed on a server in Azure, but I couldn’t remember if it was 2012 R2 or 2016.
I checked the server object in Azure and it gave me this

Hmmm…. that didn’t really answer my question (yes I could connect via RDP, but some times you can’t)
I know there are several scripts you can run to get information (that will need a connection, running scripts and so on, not everyone has this access, so they should be able to view this without scripts)
So I decided to check the disk connected to the server, and that gave me a better answer 🙂
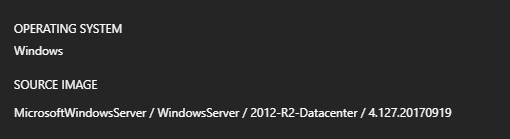
There I can see it was a 2012 R2 DC based on the image 4.127….
So in the Resource group (or on VM) find the disk for the server, and you will see the Disk info in the Overview.
Enjoy
Remove – AzureRmApplicationGateway
If you want to remove Azure Application Gateway Backend HTTP Settings / Probe configs / Backend Address Pools / HTTP Listeners or something else from the Azure Application Gateway, you might end up with the same Microsoft Doc’s as me.
https://docs.microsoft.com/en-us/powershell/module/azurerm.network/remove-azurermapplicationgatewaybackendhttpsettings?view=azurermps-4.4.1
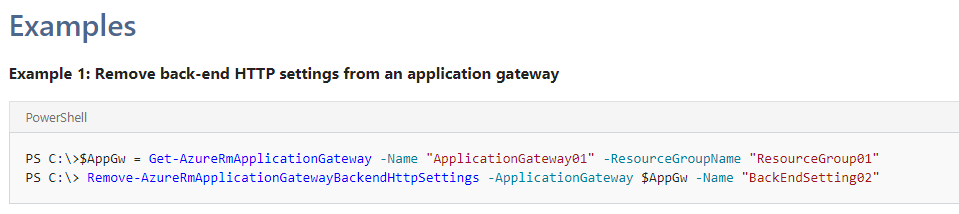
As you see from the post it tells you what to do, but when you check the config in the Portal, it is not gone.
What is missing from the information feed here is that you get the Azure Application Gateway info, then you remove it, and get the code to define it, so the missing ingredient is:
Set-AzureRmApplicationGateway -ApplicationGateway $AppGw
That way you list out the current config, then get the new config, then SET the new config.
And now it is correct in the GUI too 🙂
Can I add CPU Core and RAM to Azure VM?
Change the name of your new Azure subscription
This is not a straight forward thing, even do you would think so.
1. Open browser, enter the following: https://account.windowsazure.com/Subscriptions
- Sign inn with your Azure Subscription Owner ID
- Press the Subscription you want to change the name of
- On the right hand side, “Edit Subscription details”

- Enter the new name bellow “ SUBSCRIPTION NAME”
Name is now changed, but you need to give access to the subscription, so that you can use it in your environment.
2. Still in the account.windowsazure.com/subscriptions view
- Press the Portal icon upper right
- Find the subscriptions icon on the left side menu
- Press the subscription you want to give access to
- Press the MSN icon, so you can choose Users

- Press Add
- Choose the access level you want to delegate, and find the user.
Now you can utilize the new subscription in your Azure portal
Azure Admin Pages / URLs
There are so many different locations for Azure Subscription Management and what you can do where. So I have for my own sake made this list.
- View billing
- Add and View Subscriptions
- Add and View Subscriptions
- Delegate the use of Subscription (so it shows up in the Azure Portal for the Administrators (that are to use it))
- Manage most Azure stuff
- View and Use Subscription
- Rename, Add and View Subscriptions
It is a pain in the ass to remember the different locations, but here have it (for now)
Create #HASHED password file for PowerShell use
Connect to Azure/Office365 based on encrypted txt file
$encrypted = Get-Content “D:\Scripts\Azure_Encrypted_Password.txt” | ConvertTo-SecureString
Azure Server Sizes and information regarding them
This information is collected from: Cynthia Nottingham, and her article: virtual-machines-windows-sizes
The standard sizes consist of several series: A, D, DS, F, Fs, G, and GS. Considerations for some of these sizes include:
- D-series VMs are designed to run applications that demand higher compute power and temporary disk performance. D-series VMs provide faster processors, a higher memory-to-core ratio, and a solid-state drive (SSD) for the temporary disk. For details, see the announcement on the Azure blog, New D-Series Virtual Machine Sizes.
- Dv2-series, a follow-on to the original D-series, features a more powerful CPU. The Dv2-series CPU is about 35% faster than the D-series CPU. It is based on the latest generation 2.4 GHz Intel Xeon® E5-2673 v3 (Haswell) processor, and with the Intel Turbo Boost Technology 2.0, can go up to 3.1 GHz. The Dv2-series has the same memory and disk configurations as the D-series.
- F-series is based on the 2.4 GHz Intel Xeon® E5-2673 v3 (Haswell) processor, which can achieve clock speeds as high as 3.1 GHz with the Intel Turbo Boost Technology 2.0. This is the same CPU performance as the Dv2-series of VMs. At a lower per-hour list price, the F-series is the best value in price-performance in the Azure portfolio based on the Azure Compute Unit (ACU) per core.
The F-series also introduces a new standard in VM size naming for Azure. For this series and VM sizes released in the future, the numeric value after the family name letter will match the number of CPU cores. Additional capabilities, such as optimized for premium storage, will be designated by letters following the numeric CPU core count. This naming format will be used for future VM sizes released but will not retroactively change the names of any existing VM sizes which have been released.
- G-series VMs offer the most memory and run on hosts that have Intel Xeon E5 V3 family processors.
- DS-series, DSv2-series, Fs-series and GS-series VMs can use Premium Storage, which provides high-performance, low-latency storage for I/O intensive workloads. These VMs use solid-state drives (SSDs) to host a virtual machine’s disks and also provide a local SSD disk cache. Premium Storage is available in certain regions. For details, see Premium Storage: High-performance storage for Azure virtual machine workloads.
- The A-series VMs can be deployed on a variety of hardware types and processors. The size is throttled, based upon the hardware, to offer consistent processor performance for the running instance, regardless of the hardware it is deployed on. To determine the physical hardware on which this size is deployed, query the virtual hardware from within the Virtual Machine.
- The A0 size is over-subscribed on the physical hardware. For this specific size only, other customer deployments may impact the performance of your running workload. The relative performance is outlined below as the expected baseline, subject to an approximate variability of 15 percent.
The size of the virtual machine affects the pricing. The size also affects the processing, memory, and storage capacity of the virtual machine. Storage costs are calculated separately based on used pages in the storage account. For details, see Virtual Machines Pricing Detailsand Azure Storage Pricing.
The following considerations might help you decide on a size:
- The A8-A11 sizes are also known as compute-intensive instances. The hardware that runs these sizes is designed and optimized for compute-intensive and network-intensive applications, including high-performance computing (HPC) cluster applications, modeling, and simulations. For detailed information and considerations about using these sizes, seeAbout the A8, A9, A10, and A11 compute intensive instances.
- Dv2-series, D-series, G-series, and the DS/GS counterparts are ideal for applications that demand faster CPUs, better local disk performance, or have higher memory demands. They offer a powerful combination for many enterprise-grade applications.
- The F-series VMs are an excellent choice for workloads that demand faster CPUs but do not need as much memory or local SSD per CPU core. Workloads such as analytics, gaming servers, web servers, and batch processing will benefit from the value of the F-series.
- Some of the physical hosts in Azure data centers may not support larger virtual machine sizes, such as A5 – A11. As a result, you may see the error message Failed to configure virtual machine or Failed to create virtual machine when resizing an existing virtual machine to a new size; creating a new virtual machine in a virtual network created before April 16, 2013; or adding a new virtual machine to an existing cloud service. See Error: “Failed to configure virtual machine” on the support forum for workarounds for each deployment scenario.
Select Azure Subscription to work with
When you have a larger organisation, you will have several Azure Subscriptions to work against. So here is how you switch.
1. Open Powershell
2. Type in: Add-AzureRmAccount
(in pop-up enter admin id and password)

3. It will list up the subscription you are connected to when you have authenticated

4. Type in: Get-AzureRmSubscription
(will list out all your subscriptions)

5. Find the Subscription you want to connect to
6. Type in: Select-AzureRmSubscription -SubscriptionId “ENTER THE SUBSCRIPTION ID”

You can choose SubscriptionName too, but I prefere SubscriptionID
Add Azure CentOs server to Domain
April 23, 2018
Active Directory, Azure, Tips and Trix, Virtual Machine
No Comments
vincent
Joining a Linux machine to a Windows domain is not straight forward.
You will need to connect to the server via an SSH app (f.eks Putty)
enter the password for the adm account you created
If you get error: realm: Couldn’t join realm: Necessary packages are not installed: oddjob, oddjob-mkhomedir, sssd, samba-common-tools, you need to install the missing packages.
f.eks: yum install oddjob -y
And now the machine is in the domain
active directoryazurecentOscloudlinuxservertipstrix